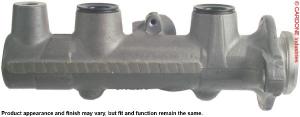
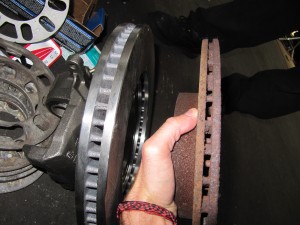
As I began planning a full-scale assault of upgrades, I’ve approached a huge problem…the front brakes! While the stock front setup uses a 302mm diameter rotor, which isn’t too bad, they’re ONLY 18mm thick. After a few seconds of hard braking these things cook…can you say brake fade. They get so hot, so fast, and retain all that heat…they’re pretty much useless. There’s nothing worse then thinking you can’t stop and then you have to get all Fred Flintstone on your floorboard. Ok…that’s a little extreme, but you get the point. I needed to figure out an affordable solution.
On the other side of things, the Rav4 uses a single 54mm piston caliper. While this is adequate for the stock setup, its marginally enough to shut down 250-300ft/lbs of torque. To say the least, a front brake upgrade is a MUST have for my Rav4 GT-T.
Where do we begin…
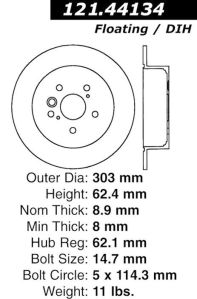
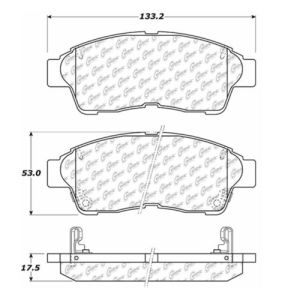
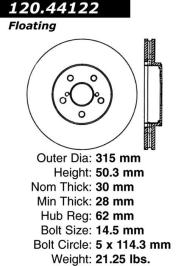
Here are the stock specs of the Rav4.1 front brakes:


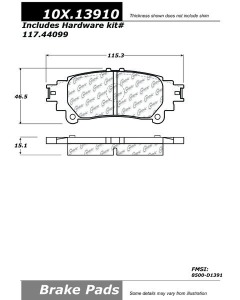
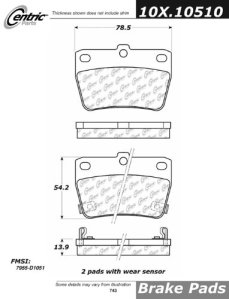
***Brackets & Pads***
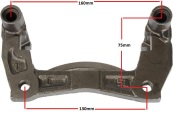
Here’s something truly insightful…Toyota has managed to design, an almost universal brake caliper system. They use a standard brake caliper bolt pattern, a 160mm between a wide range of caliper sizes. They’ve also created a standard brake pad size amongst the range as well. Combined, these give Toyota an incredible amount of flexibility throughout the entire Toyota/Lexus/Scion fleet. This also shows, just one way, how Toyota has been successful over the years. I’ve digressed…back to the subject at hand.
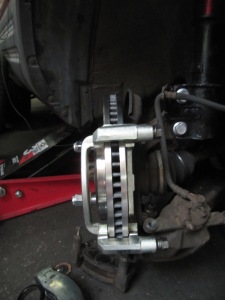
I had to start by searching for another caliper bracket that fits the Rav4 steering knuckle and supports the use of a thicker rotor (more then 18mm). So went back to a thread on Rav4World…where a member stated that the ST206 (Toyota Curren) brake caliper bracket shared the same bolt dimension as the Rav4 steering knuckle. Now WTH is a Toyota Curren (scratches head, rises eyebrow)…it’s basically a 94-99 Celica (ST202) chassis with a different body. With that said, it turns out that ST202 Celica steering knuckle has the same bracket-to-knuckle bolt pattern as the Rav4.1…130mm.

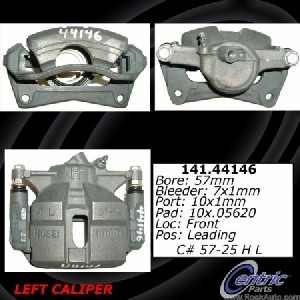
Now here in the US, the ST202 or 6th Gen Celica as some prefer, has two different brake setup: ST (base) & GT (sport). The ST caliper & bracket supports a 25mm thick rotor while the GT caliper & bracket support a 28mm thick rotor. Next up was finding out what pads fit each bracket.
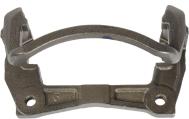
ST setup


Here a list of Toyota’s that use the same ST pads:
| GEO |
PRIZM |
(1993 – 1997) |
| TOYOTA |
CAMRY |
(1992 – 2001) |
| TOYOTA |
CELICA |
(1994 – 1997) |
| TOYOTA |
COROLLA |
(1993 – 1997) |
| TOYOTA |
RAV4 |
(1996 – 2003) |
As you can see, the ST pads are exactly same as the stock Rav4 pads.
GT setup


Here a list of Toyota’s that use the same GT pads:
| LEXUS |
ES300 |
(1992 – 1996) |
| LEXUS |
LS400 |
(1990 – 1992) |
| LEXUS |
SC300 |
(1992 – 1998) |
| TOYOTA |
AVALON |
(1995 – 2004) |
| TOYOTA |
CAMRY |
(1992 – 2001) |
| TOYOTA |
CELICA |
(1994 – 1999) |
| TOYOTA |
SIENNA |
(1998 – 2003) |
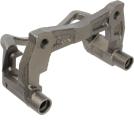
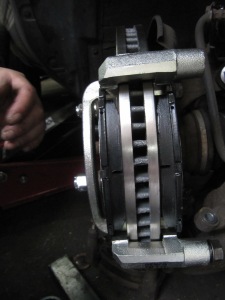
The GT uses a larger pad design. Also note the larger bracket attached the caliper, this will provide the use of a ~20mm taller diameter rotor then the ST setup.
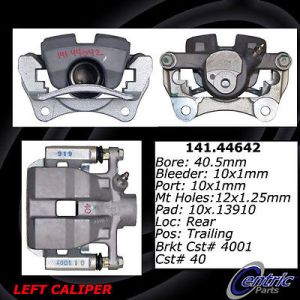
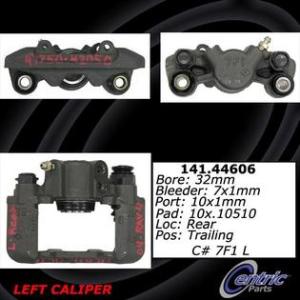
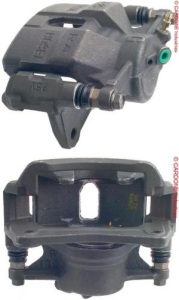
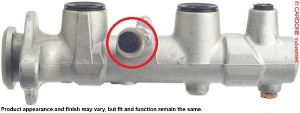
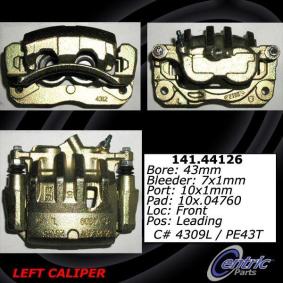
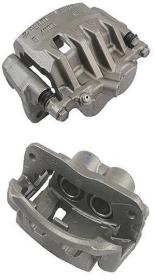
***CALIPERS***
Now I could just stop here and use either ST or GT calipers, as they both use a 57mm piston….OR I could go on and look into other potential candidates…I opted for the latter. I started to look for other non-ST202 Toyota calipers. The stock Rav4 caliper piston is 54mm, which is the same as the Corolla. If I want an upgraded setup, I needed to focus on the larger piston setups from bigger and heavier models. The concept here is, larger the piston, the more surface area…the more surface area, the more clamping force they’ll have on the rotor…the more clamping force to shut down the ~250-300hp.
The candidates:
| TOYOTA |
SIENNA |
(1998 – 2000) |

| TOYOTA |
SIENNA |
(2001 – 2003) |


| LEXUS |
ES300 |
(1994 – 1996) |
| TOYOTA |
AVALON |
(1995 – 1997) |
| TOYOTA |
CAMRY |
(1994 – 1996) |

| LEXUS |
IS300 |
(2001 – 2005) |

| LEXUS |
SC300 |
(1992 – 1998) |

| LEXUS |
SC300 |
(1999 – 2000) |
| LEXUS |
SC400 |
(1992 – 2000) |
| TOYOTA |
SUPRA |
(1993 – 1998) |

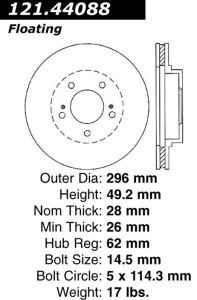
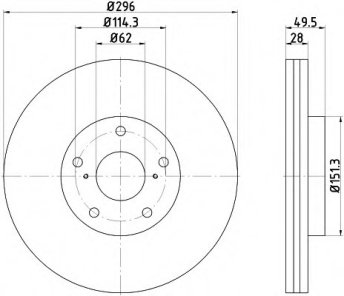
***ROTORS***
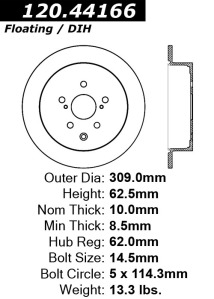
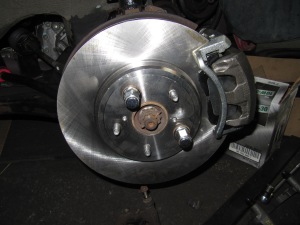
I then needed to figure out how large of a diameter rotor I would need with each corresponding pad, caliper & bracket combo. It’s important to note, you’ll need a rotor that has a 62mm hub bore and a 5×114.3 lug pattern.
Here is a list of models with matching front brake rotors :
| LEXUS |
ES300 |
2003 |
| LEXUS |
ES330 |
(2004 – 2006) |
| LEXUS |
RX300 |
(1999 – 2003) |
| TOYOTA |
CAMRY |
(2002 – 2004) |
| TOYOTA |
HIGHLANDER |
(2001 – 2007) |

| LEXUS |
LS400 |
(1995 – 2000) |

| LEXUS |
LS430 |
(2001 – 2006) |

| LEXUS |
RX330 |
(2004 – 2006) |
| LEXUS |
RX350 |
(2007 – 2009) |
| LEXUS |
RX400H |
(2006 – 2008) |
| TOYOTA |
HIGHLANDER |
(2006 – 2007) |

| TOYOTA |
SUPRA |
(1993 – 1998) |

| TOYOTA |
VENZA |
(2009 – 2010) |

| LEXUS |
RX350 |
2010 |
| TOYOTA |
HIGHLANDER |
(2008 – 2010) |

| LEXUS |
GS350 |
(2007 – 2009) |
| LEXUS |
GS430 |
(2006 – 2007) |
| LEXUS |
GS460 |
(2008 – 2009) |
| LEXUS |
IS350 |
(2006 – 2010) |

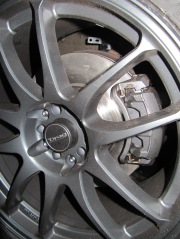
This theory laid out the foundation for my new Rav4 GTT brake setup.
LET’S RECAP
My focus is to reduce brake fade after repeated hard braking and increase the brake’s thermal capacity. So by increasing the thickness, the brakes can absorb and dissipate more heat then the stock setup and work more consistently under grueling conditions.
Another part has been increasing the rotor diameter. There a simple rule: the larger diameter of the rotor, the more force that is available to stop a wheel…kinda like using a longer wrench. It gives you the leverage and makes it easier to break a frozen bolt loose. Now in theory, if I kept the same caliper and same pads, but installed a larger diameter rotor, you would have greater stopping power. Even, a reasonably larger diameter rotor will provide increased stopping power.
The 3rd area of interest is # of pistons. The dual-piston caliper has several advantages over its single piston counterpart. The most obvious advantage is that with increased piston surface area. With increased piston area, the caliper is able to generate more torque. More torque means more stopping power with an more even pressure distribution over the pads. The more even the pressure is on the pads, the smaller the risk of the pads chattering and the better brake control you’ll have.
Of course lastly, bigger brakes without better tires and a better suspension set up to take advantage of them are pointless…stay tuned!