Rear Disc Brake Theory

This has been a long awaited topic amongst all, as we’ve all pondered and wished we had rear disc brakes. Unfortunately, Toyota didn’t see the demand for them in our US market.

I’ve spent countless hours researching and I’ve discovered that Toyota developed parts that use similar bolt patterns for certain parts. So I’ve noticed there’s a pattern on some cars with regards to their rear brakes…thus having the potential to have brakes interchangeable.

I have come to the conclusion that the following two setups will fit the rear of the RAV4.1’s in the US. I’d just like to note, since I’ve sold my RAV4 I can’t confirm these setups with work, it’s truly up to another brave RAV4 owner to give it a go!

The most difficult part of both setups is acquiring the back plate which is how it all comes together. These back plates are expensive from the dealer and can cost upwards of $300. The easiest way to do this is to swing by a local wrecker or junkyard and buy them there…make sure they are complete with the entire brake assembly.

Here’s what you’ll need:

– Backing Plates
– Drum Parking Brake Assemblies
– Drum Brake Pads
– Rotors
– Brake Pads
– Brake Shims
– Brake Calipers
– Brake Calipers Brackets
– Parking Brake Cables (may not need them as stock cable compatibility has not been confirm)

The first setup comes from our beloved family minivan, the Toyota Sienna specific the 3rd generation Sienna. While I unraveled these I discovered this setup is used on the rear of other Toyota and Lexus models:

TOYOTA SIENNA 2011-2015

TOYOTA HIGHLANDER 2014-2015

LEXUS RX350 2010-2015

LEXUS RX450H 2010-2015

Here’s a few photos of the major parts you’ll need with specs.

backingplate2 backingplate

2012siennarotors 2012siennacalipers 2012siennapads

Backing Plate Part Numbers:

LEFT REAR BACKING PLATE 46504-08020

RIGHT REAR BACKING PLATE 46503-08020

Caliper Bracket Part Numbers:

LEFT REAR BRACKET 47822-0E020

RIGHT REAR BRACKET 47821-0E020

Caliper Part Numbers:

LEFT REAR CALIPER 47830-0E020

RIGHT REAR CALIPER 47850-0E020


The second setup comes exclusively from theToyota Rav4.2 or simply the 2nd generation Rav4. These are a bit harder to find do them being a less common option and less of them on the road. Note these setup does not require a brake caliper bracket as it was design to have less parts.

TOYOTA RAV4 2001-2005

rav4.2rotors rav4.2calipersrav4.2pads

Backing Plate Part Numbers:

LEFT REAR BACKING PLATE 46504-42021

RIGHT REAR BACKING PLATE 46503-42021

Caliper Setup Part Numbers:

LEFT REAR CALIPER 47750-42050

RIGHT REAR CALIPER 47730-42050

And if you don’t this is possible just check out our Rav4 friend in Russia

http://www.drive2.ru/cars/toyota/rav4/rav4_i/gte-starichok/journal/178490/#post

I have a partial Sienna setup for sale if anyone is interested…just shoot me an email or comment. To be continued….


GOING ONCE, GOING TWICE – Any takers?

It pains me to write this but up for sale is my beloved ’96 Toyota RAV4. This is no ordinary RAV4, its rare, unique and more of an enthusiast car then your typical grocery getter. It’s been modified to receive a ST215 Toyota Caldina 3SGTE engine and its E150F transmission. It’s AWD, has dual sunroofs, power accessaries, working AC as well as some more goodies!!

Check my eBay auction at:

RAV4 GTT EBAY AUCTION

IMG_5826

If you’re interested contact me at scubastevoviii@aol.com. 

New Shoes Part Deux

After several years of driving on the stock 16 inch wheels as my winter setup, it was time for something new. And since I had a tire fail from a flat on my summer setup, it was time to retreat to a single all-season combo.

I always loved the look of the third generation Rav4, particularly the Sport model and its rims. So I searched the interwebs and found a set in good condition.

toyota-rav4-sport-v6-07IMG_6715

I got a sweet deal on a set of Falken Ziex ZE612-Plus and selected 245/45ZR18’s.

IMG_6716IMG_6714

I love the new look…here’s the outcome!!

IMG_6720   IMG_6728[1]

Front Brake Theory Pt. 2.5 – Stage 1 Brake Upgrade

I’d like to revisit my posts on brakes, as some questions have surfaced and I’d like to help answer them. For some people out there, my brake setup is not ideal because it requires some grinding for fitment and wheels spacers to use 16inch wheels…so, how does one still upgrade without having to do all that?

Well, good news is you still can upgrade from your stock setup still use your stock 16inch wheels. I haven’t had the funds or time to experiment with this and I can’t make an promises but I have a pretty good feeling this new setup will work.

Here is the Stage 1 Brake Upgrade:

Brake Caliper with Bracket – Celica ST (95-99)

Part Numbers:

RH 47721-20370 or 47721-20371

LH 47722-20080 or 47722-20081

stcelicabrakecaliper1stcelicabrakecaliper5

Rotors – Lexus RX300 (99-03)

Part Number: 43512-48011 or 43512-48060

rx300brakerotorrx300brakerotor1


Pads – Celica ST (95-99)

Part Number: 04465-20140 or 04465-33021

stcelicabrakepads

I can’t confirm any modifications will be needed but if it does, it will be less then my Stage 2 Brake Upgrade. This setup will feel and work just fine with the stock brake master cylinder.

Master Cylinder Selection

After using my upgraded brake setup for over 2 years now, I’ve begu to research again and source farther potential upgrades. As I mentioned previously, this particular setup increased pedal travel and I had recommended using a larger brake master cylinder. This is of course if you don’t like how the brakes feel. I’d like to state its not necessary as the stock master cylinder has been tested to work for more then 2 years…especially if you’re working with a tight budget, which most of us are.If have to ask yourself, that type of pedal feel do you want and how do you want the brakes to response. Now with that said here’s what I’ve gathered so far.

I always like to begin with a reference diagram of the original parts (brake master cylinder circled in red):

sxa10stockmr2toyotadiagram

The stock Rav4 brake master cylinder has a inner bore of 7/8″ inches. NOTE – I circled the front brake line outlet as this became a vital sourcing a direct bolt on upgrade.

sxa10mc3 sxa10mc2 sxa10mc1

There are two master cylinder upgraded there are direct bolts on’s…

Subject A

The ST204 1994-1999 Toyota Celica with a bore size of 15/16″ inches.

OEM Part Number # 47201-2B090

st204mc3st204mc2st204mc1

Subject B:

The MCU10 1999-2000 Lexus RX300 with a bore size of 1″ inch.

OEM Part # 47201-48030

rx300mc3rx300mc2rx300mc1

A little general advice about selecting bore size in your master cylinder may be helpful… Decreasing MC bore size will decrease your pedal effort and increase your pedal travel. Conversely, a larger bore in your car’s master cylinder will, all other components being consistent, increase your pedal effort and decrease your pedal travel. As with some other brake parts purchases, this comes down to your preference for how the brakes “feel” under foot when you are driving.

To complete this master cylinder swap, you’ll simply have to use the Rav4 brake fluid reservoir with new seals, bolt it all up, pour some fresh fluid and bleed the brakes.

Updates & News…Stay Tuned!

I’ve received a bunch emails from you guys lately regarding a 3sgte swap and I just want to say thank you for the support. I’m happy to answer any of your question, so feel free to email me at aw111mr2@msn.com any time.

Secondly, I will be working on some new post for you guys.

Photo1


And if you these site has helped you please let me know and send me some pics of your completed swap.

Front Brake Theory Part 2 – Stage 2 Brake Upgrade

Welcome to part 2 of my Front Brake Theory! I left off with alot of material from my first post…some of you have messaged me about a follow-up. I have to apologize for a late response. Since, I have selected my setup and have been testing it for over 4 months.

DISCLAIMER/WARNING: This is simply a guide, written to be and is intended as informational tips. This is not a 100% accurate or guaranteed foolproof guide. Work on your own vehicle at your own risk. If after reading through these tips, you do not feel comfortable doing the work yourself, please seek the help of a professional mechanic. I cannot be held accountable for your safety or vehicle. I do not take any responsibility for any damage to personal property or injury to yourself.

Here is the Stage 2 Brake Upgrade:

I’ve selected: Brake Bracket – Celica GT (95-99)

Part Numbers:

RH 47721-20420

LH 47722-20120

 96celicafrontbrakebracket3a 96celicafrontbrakebracket396celicafrontbrakebracket1

Rotors – Lexus LS430 (01 – 06)

Part Number: 43512-50220

Ls430rotorCalipers – Toyota Avalon (95-97)

Part Number:

RH 47730-07020

LH 47750-07020

avalon96frontcaliper avaloncalipers

Pads – Toyota MR2 Turbo (92-95)

Part Number: 04465-17060

Here are some reference shots: Rotor Comparison…Lexus LS430 (01 – 06) on the left and the Rav4 (96-00) on the right. IMG_8925 Test Fitting…the Celica GT (95-99) Brake Bracket. The dust shield was bent slightly to accommodate the larger 315mm diameter rotor. IMG_8924 More Test Fitting…the Celica GT (95-99) Brake Pads (these were too thick to seat properly into the brake pads clips). IMG_8928 Here is the caliper mounted and the complete what I’ll call “prototype” version of this setup.

IMG_8930IMG_8976

Fitment

There are few spots on the Celica Brake Bracket that need to be grinded to support the (1)thicker rotor, (2)the larger diameter as well as (3)the offset of the rotor. The newer setup will not work with the stock 16 inch wheels unless you use a wheel spacer (25mm thick)…I’m using the H&R one on my stock 16 inch wheels and it barely fits. Its probably better to use the Celica GT caliper over the Avalon calipers because the master cylinder will work much better with the single piston setup. I need to install a larger one with my setup, which means more $$ …which is what I was trying to avoid.

Driving Impressions

It’s a tight fit that will create a front brake bias (with the twin piston calipers) but works with no brake fade unlike that stock setup. Since I did not change/upgrade the master cylinder, the pedal travel has increased…while its good for pedal modulation, its in need of a larger bored cylinder due to the larger hydraulic volume in each caliper. Brake fade resistance has definitely improved. I plan on upgrading the rear brakes, changing the master cylinder and adding some stainless steel brake lines. Good luck, drive safely, and have fun!

3SGTE Engine Swap Tips

When a car enthusiast like myself buys a new car, we often have a plan…a collection of ideas of what we want. I’m no different. Before I purchased my Rav4 I knew this was going to be something big in more ways then one. If you recall, in my blog introduction, there was one specific requirement that the Rav4 doesn’t meet…having “More then 200hp.” Not satisfied by what choices I had amongst the cars I looked at, I figured if I can’t find everything I want…I’ll just build it!

I’ve received a bunch of messages from you fellow enthusiasts, asking tons of questions, looking for tips and advise. This has lead me to the hiccups…the giant ¿question-marks?…so lets highlight those:

1) Does the 3sgte bolt right up to the Rav4 engine mounts?

Yes, all S-series engines (includes: 5sfe, 3sge & 3sgte) will “bolt in” the Rav4 chassis with no modifications. And technically there is only 1 engine mount that actually bolts onto the engine…and that is the passenger side mount. The other 3 mounts connect directly to the transmission. I would advise replacing and urethane filling the engine & rear differential mounts.

2) Will the 3sgte fit stock E250F transmission?

Yes, all S-series engine share the same transmission bolt pattern thus the 3sgte will mate up to the stock E250F transmission.

3) These leads into,will the stock Rav4 clutch & flywheel fit as well?

Yes & no. Yes, they technically share the same bolt patterns and yes, you could reuse your stock flywheel (I recommend machining it before reuse). But the stock clutch is only made to handle 120-130hp and are too weak to handle the added power. So you will definitely need a new clutch kit with the 3sgte swap. On another, there has been a debate on whether or not the stock Rav4 3sfe has an 8-bolt or a 6-bolt flywheel setup. From the information I’ve gathered, the early versions of the 3sfe from late 80s Celica & Camry had a 6-bolt flywheel setup. Sometime in the 90’s Toyota made the switch from 6 to 8 bolts. Lastly my Rav4 had an 8-bolt setup.

4) Does the Celica or Caldina E150F transmission swap fit?

Yes, it bolts right up, reuses other 3 stock engine mounts…the shifter cables & shifter itself work just fine…but you’ll need a Rav4.2 driver side axle. Also the clutch line, .  Note that the speedometer will not be accurate. And lastly note that the Caldina transmission doesn’t have a VSS or Speedo Gear Ring. See my post regarding this situation HERE.

5) Is the 3sgte wiring harness plug and play?

No, you will need to either custom fabricate a harness yourself or reach to a specialist like Doug at WireGap

6) Will the stock fuel pump work?

No, the fuel pump will not flow enough volume for the injectors. You will need an upgraded pump. Check out my MOAR Fuel N Stuff post. I’d also recommend servicing the injectors.

7) Does the stock Rav4 have a returnless fuel system? Will the 3sgte required a fuel return line?

Yes, the stock Rav4 has a returnless setup and yes, this swap will require adding a fuel return line to the gas tank.

8) Are there any clearance issues in and around the engine bay?

Yes, the 3sgte turbocharger interferes with the stock Rav4 radiator fan. So a slimmer fan (less the 2.5inch thick) is needed. Since I’m using the stock Caldina air box, I had to modify the lower half to fit in properly. It also interfered with the stock coolant reservoir which I have moved slightly from it’s original position. Please note that a custom intake setup will eliminate this issue.

9) Where do you mount intercooler?

This will be your choice. If you want a front mounted intercooler, you will most likely have to sacrifice your AC condensor to create space to fit one. I opted to keep my AC and retain the stock Caldina top mounted intercooler. This required cutting the hood, adding a hood scoop with splitter to direct air flow thru the intercooler.

10) Are there any miscellaneous items that need attention?

Yes…here’s a summary of the smaller things that you will need address:

Throttle Cable – the stock Rav4 cable is too long for the Caldina intake manifold setup. So we made bracket relocating the mounting position to correct this issue.

Cruise Control – works but continuously tries to spool the turbo and once it hits boost, it cuts off. Since this has been a low priority, I really haven’t looked into it much but I suspect acquiring a 3sgte cruise control ecu would fix this.

AC Compressor – since the AC lines on the Caldina compressor are arranged differently then the Rav4’s, you’ll have to reuse your stock Rav4 AC Compressor. Also note keeping AC will limit the space in the front to mount an intercooler.

Alternator – if you choice to retain the stock Rav4 AC system, you will also need to retain the stock alternator as well. This is because of clearance issues from the turbo and the oil dip stick. I also needed to fab up a lower alternator bracket as well…to prove extra clearance.

Exhaust – since no such exhaust system exist for this type of swap, you will have to create your own custom exhaust setup.

Custom Intake – in general this is an easy one to handle, nonetheless you will also to create a custom intake setup. As noted above, I’m my setup consist of the stock Caldina air box custom fitted to the lower portion of the stock Rav4 setup. I will be upgrade to cone filter setup in the future.

OBD2 – like nearly all JDM engine swaps, you will lose OBD2 functionality. This means, depending on your region, you may have or may not have issues with inspection.
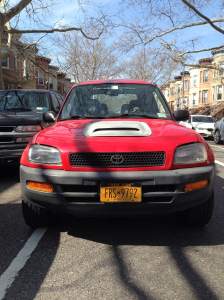