GOING ONCE, GOING TWICE – Any takers?

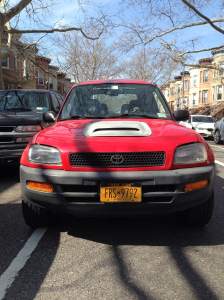
It pains me to write this but up for sale is my beloved ’96 Toyota RAV4. This is no ordinary RAV4, its rare, unique and more of an enthusiast car then your typical grocery getter. It’s been modified to receive a ST215 Toyota Caldina 3SGTE engine and its E150F transmission. It’s AWD, has dual sunroofs, power accessaries, working AC as well as some more goodies!!

Check my eBay auction at:

RAV4 GTT EBAY AUCTION

IMG_5826

If you’re interested contact me at scubastevoviii@aol.com. 

3SGTE Engine Swap Tips

When a car enthusiast like myself buys a new car, we often have a plan…a collection of ideas of what we want. I’m no different. Before I purchased my Rav4 I knew this was going to be something big in more ways then one. If you recall, in my blog introduction, there was one specific requirement that the Rav4 doesn’t meet…having “More then 200hp.” Not satisfied by what choices I had amongst the cars I looked at, I figured if I can’t find everything I want…I’ll just build it!

I’ve received a bunch of messages from you fellow enthusiasts, asking tons of questions, looking for tips and advise. This has lead me to the hiccups…the giant ¿question-marks?…so lets highlight those:

1) Does the 3sgte bolt right up to the Rav4 engine mounts?

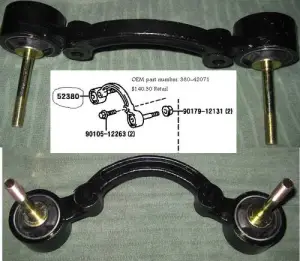
Yes, all S-series engines (includes: 5sfe, 3sge & 3sgte) will “bolt in” the Rav4 chassis with no modifications. And technically there is only 1 engine mount that actually bolts onto the engine…and that is the passenger side mount. The other 3 mounts connect directly to the transmission. I would advise replacing and urethane filling the engine & rear differential mounts.

2) Will the 3sgte fit stock E250F transmission?

Yes, all S-series engine share the same transmission bolt pattern thus the 3sgte will mate up to the stock E250F transmission.

3) These leads into,will the stock Rav4 clutch & flywheel fit as well?

Yes & no. Yes, they technically share the same bolt patterns and yes, you could reuse your stock flywheel (I recommend machining it before reuse). But the stock clutch is only made to handle 120-130hp and are too weak to handle the added power. So you will definitely need a new clutch kit with the 3sgte swap. On another, there has been a debate on whether or not the stock Rav4 3sfe has an 8-bolt or a 6-bolt flywheel setup. From the information I’ve gathered, the early versions of the 3sfe from late 80s Celica & Camry had a 6-bolt flywheel setup. Sometime in the 90’s Toyota made the switch from 6 to 8 bolts. Lastly my Rav4 had an 8-bolt setup.

4) Does the Celica or Caldina E150F transmission swap fit?

Yes, it bolts right up, reuses other 3 stock engine mounts…the shifter cables & shifter itself work just fine…but you’ll need a Rav4.2 driver side axle. Also the clutch line, .  Note that the speedometer will not be accurate. And lastly note that the Caldina transmission doesn’t have a VSS or Speedo Gear Ring. See my post regarding this situation HERE.

5) Is the 3sgte wiring harness plug and play?

No, you will need to either custom fabricate a harness yourself or reach to a specialist like Doug at WireGap

6) Will the stock fuel pump work?

No, the fuel pump will not flow enough volume for the injectors. You will need an upgraded pump. Check out my MOAR Fuel N Stuff post. I’d also recommend servicing the injectors.

7) Does the stock Rav4 have a returnless fuel system? Will the 3sgte required a fuel return line?

Yes, the stock Rav4 has a returnless setup and yes, this swap will require adding a fuel return line to the gas tank.

8) Are there any clearance issues in and around the engine bay?

Yes, the 3sgte turbocharger interferes with the stock Rav4 radiator fan. So a slimmer fan (less the 2.5inch thick) is needed. Since I’m using the stock Caldina air box, I had to modify the lower half to fit in properly. It also interfered with the stock coolant reservoir which I have moved slightly from it’s original position. Please note that a custom intake setup will eliminate this issue.

9) Where do you mount intercooler?

This will be your choice. If you want a front mounted intercooler, you will most likely have to sacrifice your AC condensor to create space to fit one. I opted to keep my AC and retain the stock Caldina top mounted intercooler. This required cutting the hood, adding a hood scoop with splitter to direct air flow thru the intercooler.

10) Are there any miscellaneous items that need attention?

Yes…here’s a summary of the smaller things that you will need address:

Throttle Cable – the stock Rav4 cable is too long for the Caldina intake manifold setup. So we made bracket relocating the mounting position to correct this issue.

Cruise Control – works but continuously tries to spool the turbo and once it hits boost, it cuts off. Since this has been a low priority, I really haven’t looked into it much but I suspect acquiring a 3sgte cruise control ecu would fix this.

AC Compressor – since the AC lines on the Caldina compressor are arranged differently then the Rav4’s, you’ll have to reuse your stock Rav4 AC Compressor. Also note keeping AC will limit the space in the front to mount an intercooler.

Alternator – if you choice to retain the stock Rav4 AC system, you will also need to retain the stock alternator as well. This is because of clearance issues from the turbo and the oil dip stick. I also needed to fab up a lower alternator bracket as well…to prove extra clearance.

Exhaust – since no such exhaust system exist for this type of swap, you will have to create your own custom exhaust setup.

Custom Intake – in general this is an easy one to handle, nonetheless you will also to create a custom intake setup. As noted above, I’m my setup consist of the stock Caldina air box custom fitted to the lower portion of the stock Rav4 setup. I will be upgrade to cone filter setup in the future.

OBD2 – like nearly all JDM engine swaps, you will lose OBD2 functionality. This means, depending on your region, you may have or may not have issues with inspection.

E150F Transmission Swap

When planning my AR4 project I knew my stock E250F transmission was going to have to be replaced. The 3rd gear synchro was baddly worn on the downshift side (worked perfectly on upshift though, bizarre). Anyhow as I search for 3sgte’s I was debating whether to acquire a transmission with the new motor. I then began compiling gear ratio data and comparing it to what I wanted out of this project. I’ll spare the details unless you guys are interested.

Ok, once I got through the data, I decided my choose was going to be either a E154F from a ST205 Celica GT4 or an E150F from a ST215 Caldina. I decided to get a Gen4 3sgte with a E150F from a Caldina GTT. After picking up an ST215 motor with E150F transmission, I unknowingly came across a few issues:

1. It does not have a Center Differential Lock

Now depending on your stand point, this could be a good thing or bad. The bad is, well if your stuck in a tough situation, say a heavy snow storm, you don’t have the option to lock the center diff to guarantee a 50/50 front/rear power split. The good, less weight…and from a motorsports perspective, you really don’t want 100% lock at any given time from center diff….you want 40/60 or 50/50 but never lock the front/rear together as that will cause major understeer from what I understand. So, in the end I’m ok with this.

*PLEASE Watch this video for a better understanding of the Alltrac system:

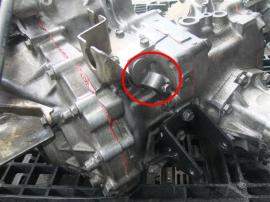
2. It does not have a Vehicle Speed Sensor (VSS, SXA10 RAV4 OEM # 83181-12050)

With no VSS, I’m not able to determine the speed of the car. The Caldina is more modern, in the sense that it uses wheel speed sensors to tell you how fast it is going.

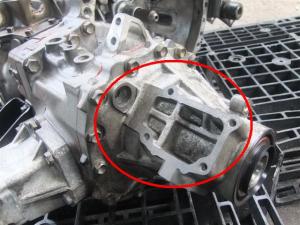
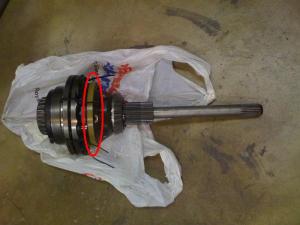
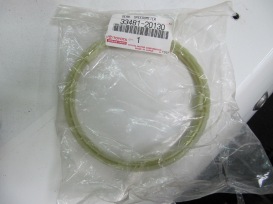
3. It does not have a Differential Speedo Gear Ring (OEM # 33481-20130)

Without the gear ring, I’m unable to use a VSS and again I’m unable to determine the speed of the car.

To solve #’s 2 & 3, well let’s just say, sometimes things get complicated. You have to be wondering why…well to keep this short, the E150F has different gear ratios then the stock E250F. I needed to match the Differential Speedo Gear Ring to the appropriate VSS gear to get an accurate speedometer reading. I ordered a new Differential Speedo Gear Ring shown above and decided to reuse my original stock Rav4 VSS. This combo was going to work best with my new wheel diameter setup and E150F transmission gear ratios.

But here was the tricky and time consuming part…I had to completely dismantle the transmission to install the Differential Speedo Gear Ring. So, I ultimately do not recommended using a E150F from a Caldina ST215.

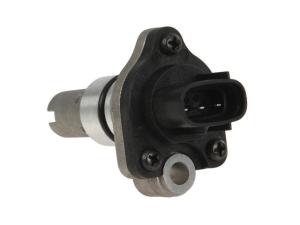
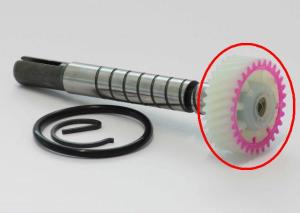
Here is the stock Rav4.1 VSS & VSS Driven Gear:

4. The inner axle shaft (side that connects to the transmission) is different from the SXA10 Rav4’s.

Now, what is the inner axle issues:

– The RAV4’s inner CV spline has a 23 or 24 teeth (can’t remember) and has a short length spline.

– The Caldina inner CV splines has 25 teeth and requires a longer length spline.

It’s been stated by Bongbong10 that an ACA21 or Rav4.2 axle would work. Now I needed to figure out which Rav4.2 driverside axle would work; AWD or FWD, Manual or Automatic, ABS or Non-ABS??? I ended with a Cardone Remanufactured AWD, Manual, Non-ABS Driver Side Rav4.2 Axle.

With it’s longer inner spline and proper # of teeth, this axle fits the E150F transmission perfectly. But we’re not done, the outer part of the shaft is a bit fatter or thicker causing the inner shaft to rubber and not fit in properly. It will need to be machined down or grinded down to fit.  OR another option to get it to fit, which is what I did at the expense of a shortened wheel bearing life span, is to remove the wheel bearing dust deflector and seal.

I’ll here more pics when my swap is complete, to be continued…

PLEASE NOTE: Both outer CV splines (the ones that connect to the hubs) have same # of teeth and length as the stock Rav4. Thus there is no modification needed. Also the stock Rav4.1 passenger side axle fits the E150F, no problem.

The Infamous Clunk

The first day I drove my Rav4, I immediately noticed the clunk or thud noise in drive-train. The noise came from the rear…turns out this is what was actually going on:

I took a look and saw my rear mount of my rear differential was filled with some type of hard urethane. I knew there had to be another mount and I knew there had to be a center driveshaft mount as well. Confused I decided to start researching info on it…turns out this is a fairly common problem.

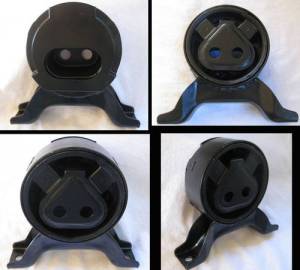
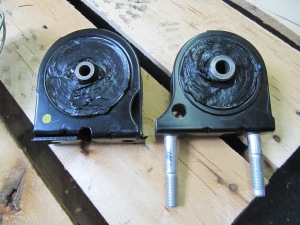
Here are the 2 rear diff mounts at hand:

My next step was to correct the problem properly. Initial findings suggest filling the rear mount of the diff with a polyurethane caulk. Well, mine was already caulked with some, so just doing that alone with only partial fix the problem or make it worse. If you fill or replace the rear mount, the front mount of the rear diff will simply become the new weak point. The bottom line here is, you need to replace or fill both.

A fellow Rav4 enthusiast known as cb1000rider on Rav4World.com has done alot of research and replied to many us with this issue. He’s gone above and beyond to make his own more affordable aftermarket Differential Mount Replacements for Rav4.1.

I went ahead and ordered both mounts last year.

I then decided to take it extra step further and urethane fill the mounts with a what’s been recommended across the internet, 3M Windo-Weld. I started by using masking tape first, to keep things neat and then I used my standard caulk gun to make it all happen. I let these dry for a over 2 weeks before I installed them.

Filling the mounts was my way to insure that they were as stiff as possible. 3M Windo-Weld is rated as Shore 60A, stiff enough to be better then stock but not too stiff where it would become too uncomfortable while driving. Lastly another reason for doing this was to prepare from my Caldina Gen4 3SGTE swap, more power, more engine & drivetrain movement.

Also note I opted to fill my front and rear motor mounts at the same time.

*IMPORTANT NOTE* I’d also like to point out that I installed the rear diff mounts first…there was a noticeable difference but there was still a hint of clunk. As I had suspected, if your engine mounts are worn out, changing just the rear diff mounts will not be enough. You’ll have to get new engine mounts too. I’ve confirmed this when I installed the new filled engine mounts a few weeks after and the noise was completely gone. So please, DO NOT under estimate the need for new engine mounts. All of these parts, engine and entire drive-train are connected, if one moves, it translates to more movement at another location. Cheers!

IMG_8715

Clutch & Shifter Upgrades

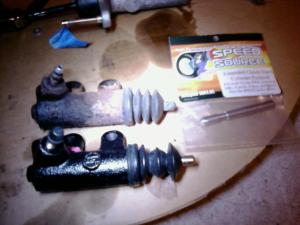
I had a hunch that some Celica parts (ST185 & ST205) were interchangeable with the Rav4. More specifically, I was looking to upgrade my spongy feeling old clutch line and worn out shifter cable bushings. I have a lot of brand loyalty and decided to follow the lead I took with my MR2…hence I turned to Two R Us for some new Speed-Source Stainless Steel Braided Clutch Line, Extended Clutch Slave Cylinder Pushrod and Brass Shifter Bushings.

I ordered the “Big! Toyota Solid Brass Shift Cable Bushings” & “Teflon Lined Braided Steel Clutch Line” for a Celica GT4 90-93 ST185 (94-99 ST205). I gambled without knowing for sure but I can now confirm these items fit perfectly on the Rav4.1.

Here’s a quick photo of the clutch line installed.

It’s tough to get a clear picture because the engine bay is so tight. Since I am using an aftermarket clutch with heavy pressure plate, complete disengagement of the clutch is difficult. This makes gear changes difficult and may make the transmission grind when shifting from neutral…NOT GOOD! So I lastly picked up Extended Clutch Slave Cylinder Pushrod too. It’s ¼” longer than stock, made from CNC turned 303 stainless steel. It’s slightly longer shaft puts the slave cylinder piston further back in its bore, thus allowing a longer stroke and more disengagement. Once I completed the installation I also re-adjusted the clutch pedal adjustment point to get it just right.